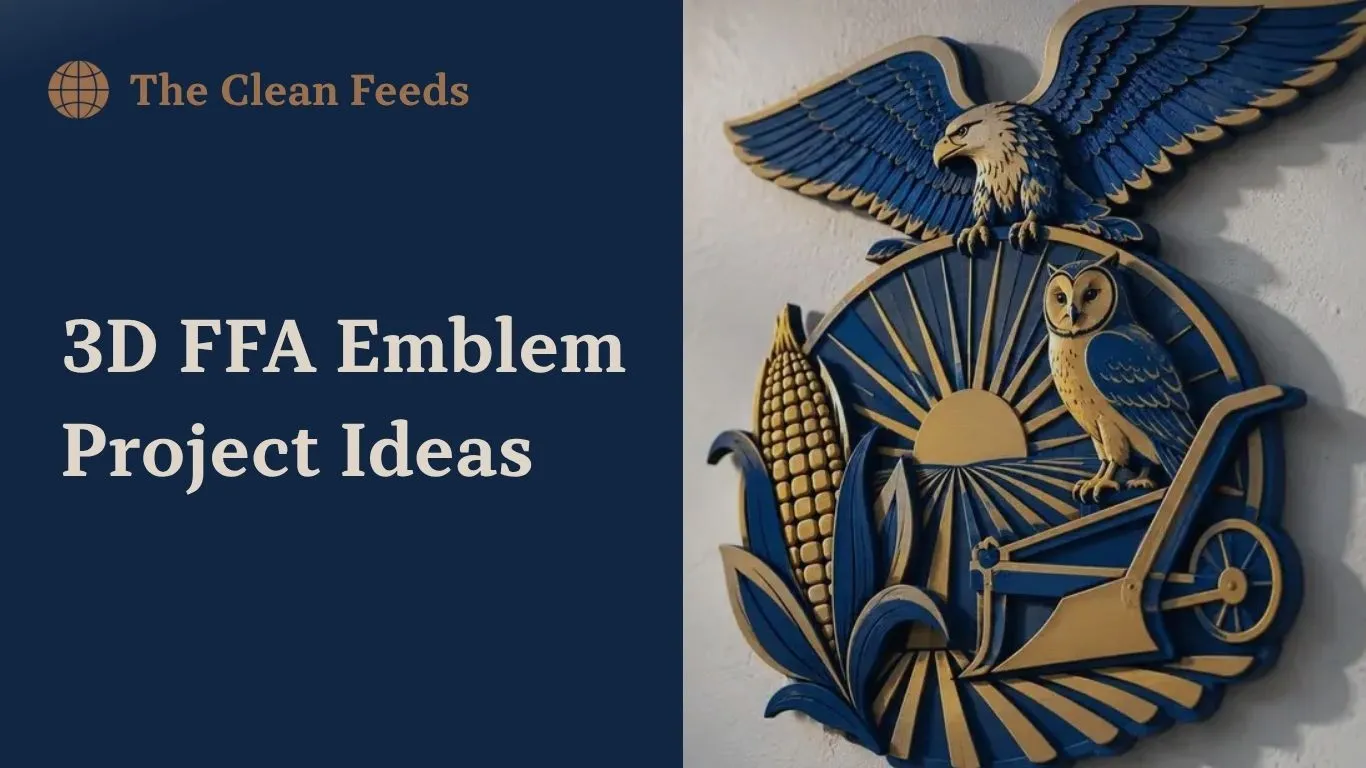
A 3D FFA emblem looks simple until you start building one. The emblem packs an eagle, an owl, a plow, a rising sun and a cross-section of corn into one tight shape. Get the depth wrong and the owl disappears. Get the rules wrong and your chapter could face a trademark problem.
This guide covers 3D FFA emblem project ideas for different skills, tools and budgets. You will find ideas for 3D printers, woodshops, welding bays and plain classroom tables. Each one works for a chapter display, a Supervised Agricultural Experience (SAE) or a class project.
Read more: 100+ Science Project Ideas for Class 8: Easy and Unique Picks
What Each Symbol in the FFA Emblem Means

Before you pick a build, know what you are building. Members are expected to explain each symbol, and your project will look better if you understand them.
According to RFD-TV, the cross-section of an ear of corn is the base of the emblem, and it stands for unity because corn grows in every state. The rising sun stands for progress and the promise of a new day.
The plow stands for labor and working the soil. The eagle stands for freedom and new horizons in agriculture, and the owl stands for the wisdom needed to succeed in the industry.
Color matters too. The official FFA colors are national blue and corn gold. Use both in your paint, filament or finish.
The design has history behind it. Delegates adopted the emblem at the first national convention in 1928, using features from the Future Farmers of Virginia. In 2015, the National FFA refined the artwork to make the eagle, owl, shield, plow and arrows clearer.
That detail is your biggest challenge in 3D. Small parts like the owl’s face and the plow handle must stay readable at your chosen size. Before you cut or print anything, though, you need to know the rules.
Read more: 50+ Best Out of Waste Ideas for School Project: Easy and Unique Picks
Rules for Any 3D FFA Emblem Project

The National FFA Organization owns the emblem as a trademark. Your chapter can make many things without asking, but some uses need approval.
On the FFA brand center, chapters and state associations do not need a license, but they must use a licensed vendor to make products that carry the FFA marks. That covers shirts, mugs and similar items made by outside companies.
Selling is a different matter. A special license covers SAE projects and school-based businesses that sell products made by members and chapters. Commercial use, such as merchandise, sales, advertising and sponsorships, needs special permission.
The brand guide also sets limits on how the emblem looks. It warns against skewing, bending, stretching, rotating or cropping the emblem, and against adding extra elements or drop shadows. It adds that some uses need special permission from the Marketing and Communications division at National FFA.
Those rules were written with flat graphics in mind. A 3D build is a different case, so ask your advisor and National FFA before you share or sell a design. A safe approach is to build the full emblem, keep every symbol and add nothing to it.
Read more: 149+ Science Fair Project Ideas for 6th Graders (Easy & Fun)
12 3D FFA Emblem Project Ideas

1. Layered 3D Printed Wall Emblem
Skill level: Beginner to intermediate. Tools: 3D printer and slicer software.
Print the emblem in stacked layers. The corn border sits at the back. The sun rays, plow, eagle and owl rise in front. Each level adds depth that a flat sign cannot match.
Print each part separately so the colors stay sharp. Use national blue and corn gold filament, or paint the pieces afterward. Glue everything onto a backing board.
Test a small version first. A test print saves hours of wasted plastic. Your finished wall display gets real shadow lines that change through the day.
If you want it to glow instead, the next idea adds light.
2. Backlit LED Lightbox Emblem
Skill level: Intermediate. Tools: 3D printer, LED strip, USB power source.
Print the emblem as a thin panel with a hollow box behind it. Place an LED strip inside. Thin sections let light through, and thick sections block it. The symbols show up as bright and dark shapes.
White filament spreads light best. Hide the wiring in the back of the box. Low-voltage USB strips are a safe choice for a school setting.
This one suits a chapter room, a trophy case or a banquet table. It also gives you a strong photo for your chapter’s social page.
3. Five-Symbol Display Set
Skill level: Beginner. Tools: 3D printer or any carving tool.
Skip the full emblem and build each symbol as its own model. Make the corn, the sun, the plow, the owl and the eagle as separate pieces.
This idea ties into chapter ceremonies. The ear of corn, rising sun, plow and owl also stand for specific chapter offices and are mentioned in opening ceremonies. A set of models can sit at each officer station.
Small pieces print fast and fail less often than one big emblem. That makes this a good first project for a new member.
4. Keychains, Bookmarks and Desk Gifts
Skill level: Beginner. Tools: 3D printer.
Small prints make easy gifts for sponsors, alumni and new members. A keychain or bookmark prints quickly, and a batch is easy to finish.
You will not start from scratch. One model-search site lists more than 3,400 results for “ffa,” including keychains, bookmarks, cups, door stops and desk organizers. Not every result is the agricultural emblem, and shared files carry their own licenses.
Read the license on any file you download. Then check the FFA rules above before you print for anyone outside your chapter.
5. Cookie Cutters and Embossing Stamps
Skill level: Beginner. Tools: 3D printer.
A cutter shaped like the emblem turns a bake sale into a chapter showpiece. A printed stamp can press the shape into clay, dough or soft wax.
The same model-search listings include an emblem cookie cutter and a custom embossing stamp. Ask your teacher about food-safe filament before any print touches dough.
Fundraising has its own rules. FFA allows chapters to use the marks on products for fundraising, with sales limited to the chapter’s local area. Confirm the current process with your advisor first.
6. Carved Wood Relief
Skill level: Intermediate to advanced. Tools: Chisels or a rotary tool, sandpaper, paint or stain.
Trace the emblem onto a thick board. Carve the background down in steps so the eagle, owl and plow stand out. Basswood is a common choice because it cuts easily.
Plan the depth before you cut. The border can stay highest, the sun rays can sit a step lower, and the owl can sit lower still. Mark each level with pencil lines.
Wear eye protection and work under teacher supervision. Finish with stain for the corn and paint for the blue field.
7. Stacked Laser-Cut or Router-Cut Emblem
Skill level: Intermediate. Tools: Laser cutter or CNC router, design software, wood glue.
A CNC router is a machine that cuts shapes from a digital file. A laser cutter does the same job with a beam. Both can slice the emblem into clean layers.
Cut four or five layers from plywood or acrylic. Use blue acrylic for the field and gold for the corn. Glue the layers in order.
This method gives crisp edges that hand carving rarely matches. It also teaches members how a design moves from screen to shop.
8. Plasma-Cut or Welded Steel Emblem
Skill level: Advanced. Tools: Plasma cutter, welder, grinder, paint or powder coat.
Cut the emblem parts from sheet steel and weld them in layers. Grind the edges smooth, then paint or coat the metal in FFA colors.
A steel emblem holds up outdoors. It can hang on a barn, a gate or the front of the ag building. It also gives welding students a project with a clear finish line.
Only trained members should run the cutting and welding. Follow your shop’s safety rules for every step.
9. Clay or Ceramic Relief Tiles
Skill level: Beginner to intermediate. Tools: Clay, carving tools, kiln, glaze.
Press clay into a flat slab and carve the emblem in raised layers. Fire the tile in a kiln, then glaze it in national blue and corn gold.
This project brings the art room into the chapter. It also works for members who prefer hands-on sculpting over machines.
Make a small batch of tiles and mount them in a row. Each tile can show one symbol, which ties back to the five-symbol idea.
10. Large Outdoor Emblem Display
Skill level: Advanced. Tools: Concrete forms, treated lumber or steel, paint.
Some chapters think big. The Marshall FFA chapter received a statue of the emblem that weighs about 2 tons and stands 80 inches tall. The artist who made it was licensed by FFA to produce replicas.
The donor, Mike Hisle, said the gift was meant as “a reminder of our community’s rich agricultural history.” You can read the full story on the Marshall Schools website.
Your chapter can build a smaller version from cast concrete, stacked lumber or steel. Plan the base, drainage and weather finish before you start. Get approval from the school before anything goes in the ground.
11. Digital 3D Model and Animation
Skill level: Beginner to advanced. Tools: Tinkercad or Blender.
No shop access? Build the emblem on a computer. Tinkercad is a free tool that runs in a web browser. Blender is a free program with more advanced features.
Model each symbol, then render a slow turntable video. Post it on the chapter’s page or play it at the banquet. You can also export the model later for printing.
This route teaches design skills that carry into agricultural technology work. It also costs nothing.
12. Teaching Model for New Members
Skill level: Beginner. Tools: Any build method above.
Build the emblem as a puzzle. Each symbol lifts out, and its meaning is written on the back. New members can assemble it while they learn what each piece stands for.
This idea fits a real need. A New Jersey sample chapter constitution lists describing and explaining the meaning of the emblem and colors among its degree requirements.
A hands-on model is easier to remember than a flashcard. It also gives your officers a ready tool for greenhand training.
How to Choose the Right 3D FFA Emblem Project
Match the project to what your school already owns. A chapter with a 3D printer should start with the layered wall emblem or the five-symbol set. A chapter with a strong shop can go to steel or router-cut layers.
Short on time? Pick keychains, bookmarks or a single symbol. They finish in days, not weeks.
Short on money? Clay tiles, carved wood and digital models need few supplies. Your biggest cost is your own time.
Want a project that counts toward your SAE? Talk to your advisor about the school-based license before you plan any sales. That one step protects your chapter and your grade.
Read more: 20 Fun and Easy Digestive System Project Ideas for Students
Build Tips for a Clean 3D FFA Emblem
Start with an official file, not a screenshot. The FFA brand center offers approved emblem files, color values and templates.
Test the smallest details first. Print or cut the owl and the plow handle at full size before you commit to the whole piece.
Keep the proportions exact. Do not stretch the emblem to fit a board. Pick a board that fits the emblem instead.
Finish with care. Sand the surface, prime it and paint in national blue and corn gold. A clear coat protects the color.
Photograph every stage. Photos help with SAE records and give your chapter content for its social pages.
FAQ
What is the easiest 3D FFA emblem project?
A set of keychains or a single-symbol print is the easiest start if your school has a 3D printer. Without a printer, a clay tile or a small carved plaque needs only basic tools.
Can my chapter use the FFA emblem without permission?
Chapters can use the marks for many non-commercial purposes without a license. Products that carry the marks must come from a licensed vendor, and commercial use needs special permission, according to the FFA brand center.
Can I sell a 3D printed FFA emblem?
Members and chapters can use the marks through the Chapter or SAE Enterprise License. Businesses that want to sell products with the FFA emblem must apply for a Standard License.
What colors should a 3D FFA emblem use?
Use national blue and corn gold. Those are the official FFA colors, and they should appear in your paint, filament or finish.
Where can I find official FFA emblem files?
The FFA brand center hosts approved emblem files, color values and templates. Start there instead of copying an image from a search page.
Which free software works for designing a 3D emblem?
Tinkercad runs in a browser and suits beginners. Blender is free and handles more detailed work, such as animation and fine carving.